
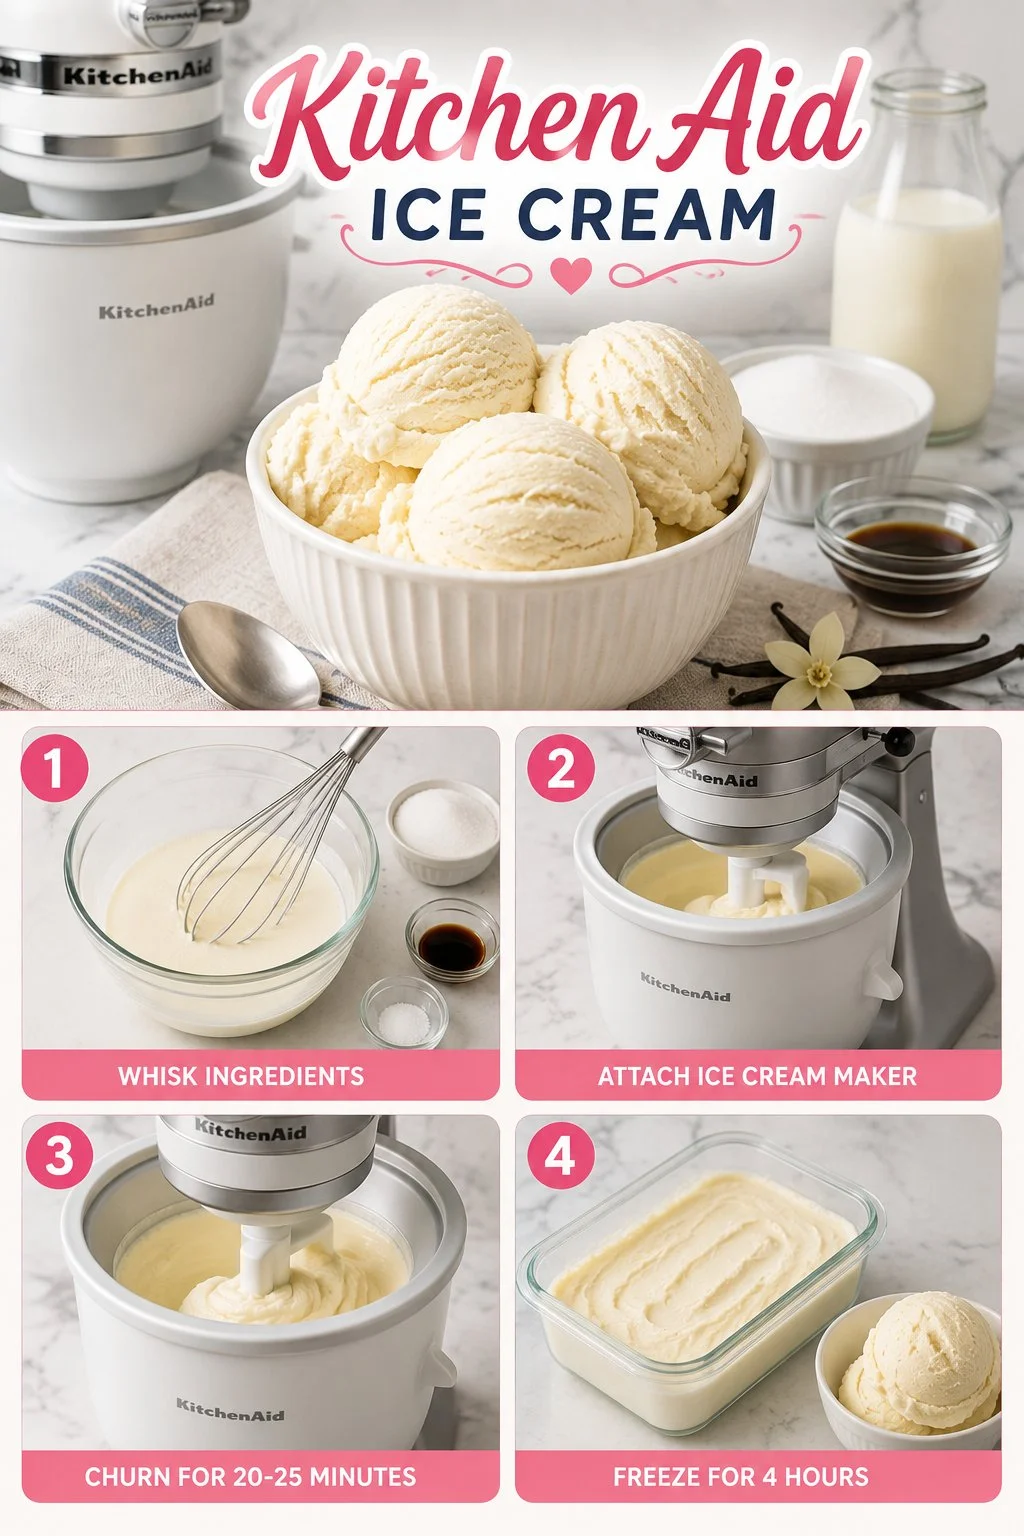
When I first used my Kitchen Aid ice cream maker, I could hardly contain my excitement. The idea of making fresh ice cream at home filled me with joy, especially during those sweltering summer days. I remember gathering the ingredients—a simple yet delightful mix of cream, sugar, and vanilla—and feeling the anticipation build as I prepared the machine. The sound of the churner working its magic is music to the ears, and soon enough, we were rewarded with a creamy, dreamy ice cream that tasted so much better than store-bought. It’s moments like these that turn an ordinary day into something special, and that’s why having a Kitchen Aid ice cream maker is a game-changer for any ice cream lover.
What is Kitchen Aid Ice Cream
Kitchen Aid ice cream refers to the delicious frozen dessert made using Kitchen Aid’s ice cream maker attachment for their stand mixers. This appliance transforms your kitchen into an ice cream parlor, allowing you to create a variety of flavors right at home. The ice cream maker attachment works by churning the mixture as it freezes, enabling you to produce smooth and creamy textures without the need for manual churning. The result is homemade ice cream that’s customizable, fresh, and free from preservatives found in many commercial products. With just a few basic ingredients, the possibilities for flavor experimentation are endless.
Why You’ll Love This Kitchen Aid Ice Cream
Making ice cream with a Kitchen Aid mixer comes with numerous advantages:
- Quick and simple to prepare
- Family-friendly treat that everyone can enjoy
- Great for beginners with no prior experience
- Customizable flavors and textures to suit your palate
- Fresh ingredients ensure a healthier dessert option
- A fun activity for gatherings and celebrations
This delightful process is not only satisfying but also encourages creativity in the kitchen. You can enjoy classic vanilla or experiment with bold combinations, ensuring that your homemade ice cream is always a hit.
Ingredients
- 2 cups heavy cream
- 1 cup whole milk
- 3/4 cup granulated sugar
- 1 teaspoon vanilla extract
- Pinch of salt
These simple ingredients form the base of your ice cream. The heavy cream adds richness while the whole milk keeps the consistency smooth. Sugar enhances the sweetness, and the vanilla extract brings warmth to the flavor.
Step-by-Step Instructions for Kitchen Aid Ice Cream
In a mixing bowl, whisk together the heavy cream, whole milk, granulated sugar, vanilla extract, and a pinch of salt until the sugar is completely dissolved. This mixture should be smooth and free of lumps.
Pour the mixture into the Kitchen Aid ice cream maker bowl and securely attach it to your Kitchen Aid stand mixer.
Turn on the mixer while setting the speed to a low level. Churn the ice cream mixture for approximately 20 to 25 minutes. You’ll notice the mixture thickening as it freezes.
Once you reach a soft-serve consistency, transfer the ice cream into an airtight container. Place it in the freezer for at least 4 hours, allowing it to harden further before serving.
Following these steps will ensure you create a luscious and creamy ice cream that can be enjoyed on its own or paired with your favorite desserts.
Pro Tips and Variations
To enhance your ice cream-making experience, consider these pro tips:
Chill the Ice Cream Bowl: Before making the ice cream, ensure that the bowl is frozen for at least 24 hours. This aids in achieving a better texture.
Experiment with Flavors: Try adding mix-ins such as chocolate chips, fruits, or nuts just before the ice cream is done churning for added texture and flavor.
Use Infused Ingredients: For unique flavors, steep ingredients like mint leaves or spices in the milk mixture before combining with the cream.
Make It Dairy-Free: Substitute heavy cream and milk with coconut cream and almond or oat milk for a dairy-free version.
Add a Swirl: Create marble effects by swirling in sauces like caramel or chocolate during the last minutes of churning.
Each of these tips transforms a regular ice cream-making session into a tasty adventure.
How to Serve Kitchen Aid Ice Cream
Serving homemade ice cream can be as delightful as making it. Here are some ideas to enhance your experience:
- Classic Cones: Serve your ice cream in waffle cones or sugar cones for a traditional look.
- Sundae Bar: Set up toppings such as chopped nuts, fresh fruits, whipped cream, and syrups, allowing everyone to create their own sundaes.
- Ice Cream Sandwiches: Use cookies to sandwich scoops of ice cream for a fun and delicious treat.
- Milkshakes: Blend your ice cream with milk for a creamy milkshake to enjoy on a hot day.
- Pair with Desserts: Serve alongside brownies or slices of cake for a delightful dessert combination.
The versatility of homemade ice cream makes it a perfect addition to many dishes and occasions.
How to Store Kitchen Aid Ice Cream
Storing your homemade ice cream properly will keep it fresh and delicious. Here’s how to do it:
Airtight Container: Transfer the ice cream into an airtight container to prevent ice crystals from forming and to maintain its texture.
Freezing: Store the container in the coldest part of your freezer. Homemade ice cream is best consumed within 1 to 2 weeks for optimal flavor and texture.
Serving from the Freezer: Before serving, let the ice cream sit at room temperature for about 5 to 10 minutes to soften a bit, making it easier to scoop.
Following these storage guidelines will ensure that your ice cream remains just as delightful as the day it was made.
Nutrition Information
While enjoying homemade ice cream, it’s helpful to be mindful of the nutrition. Here’s an approximate breakdown per serving:
- Calories: 300
- Total Fat: 20g
- Saturated Fat: 12g
- Carbohydrates: 28g
- Sugar: 24g
- Protein: 3g
These numbers can vary based on the specific ingredients you use and any additional mix-ins you choose to add. Keep in mind that while homemade ice cream can be rich, it is also customizable to fit various dietary preferences.
FAQs about Kitchen Aid Ice Cream
Q: Can I make ice cream without an ice cream maker?
Yes, you can use a different mixing method, but the Kitchen Aid ice cream maker simplifies the process and yields a smoother texture.
Q: How can I adjust the sweetness?
Feel free to modify the amount of sugar according to your taste preferences. Natural sweeteners can also be used as alternatives.
Q: What if my ice cream is too hard?
If your ice cream becomes too hard after freezing, let it sit out for a few minutes before scooping to soften it.
Q: Can I use this recipe for other frozen desserts?
Absolutely! This base recipe can be used as a foundation for sorbets, frozen yogurts, or other creamy desserts by adjusting the ingredients accordingly.
Conclusion
Making Kitchen Aid ice cream at home not only satisfies your sweet tooth but also provides an opportunity to express your creativity. This delightful treat is simple to prepare, giving you the freedom to explore an array of flavors. So why not dive in, try out this recipe, and share your delicious creations with family and friends? Enjoy the fun of personalizing every scoop and revel in the joy it brings to your gatherings. Your homemade ice cream will surely become a cherished favorite among loved ones.