
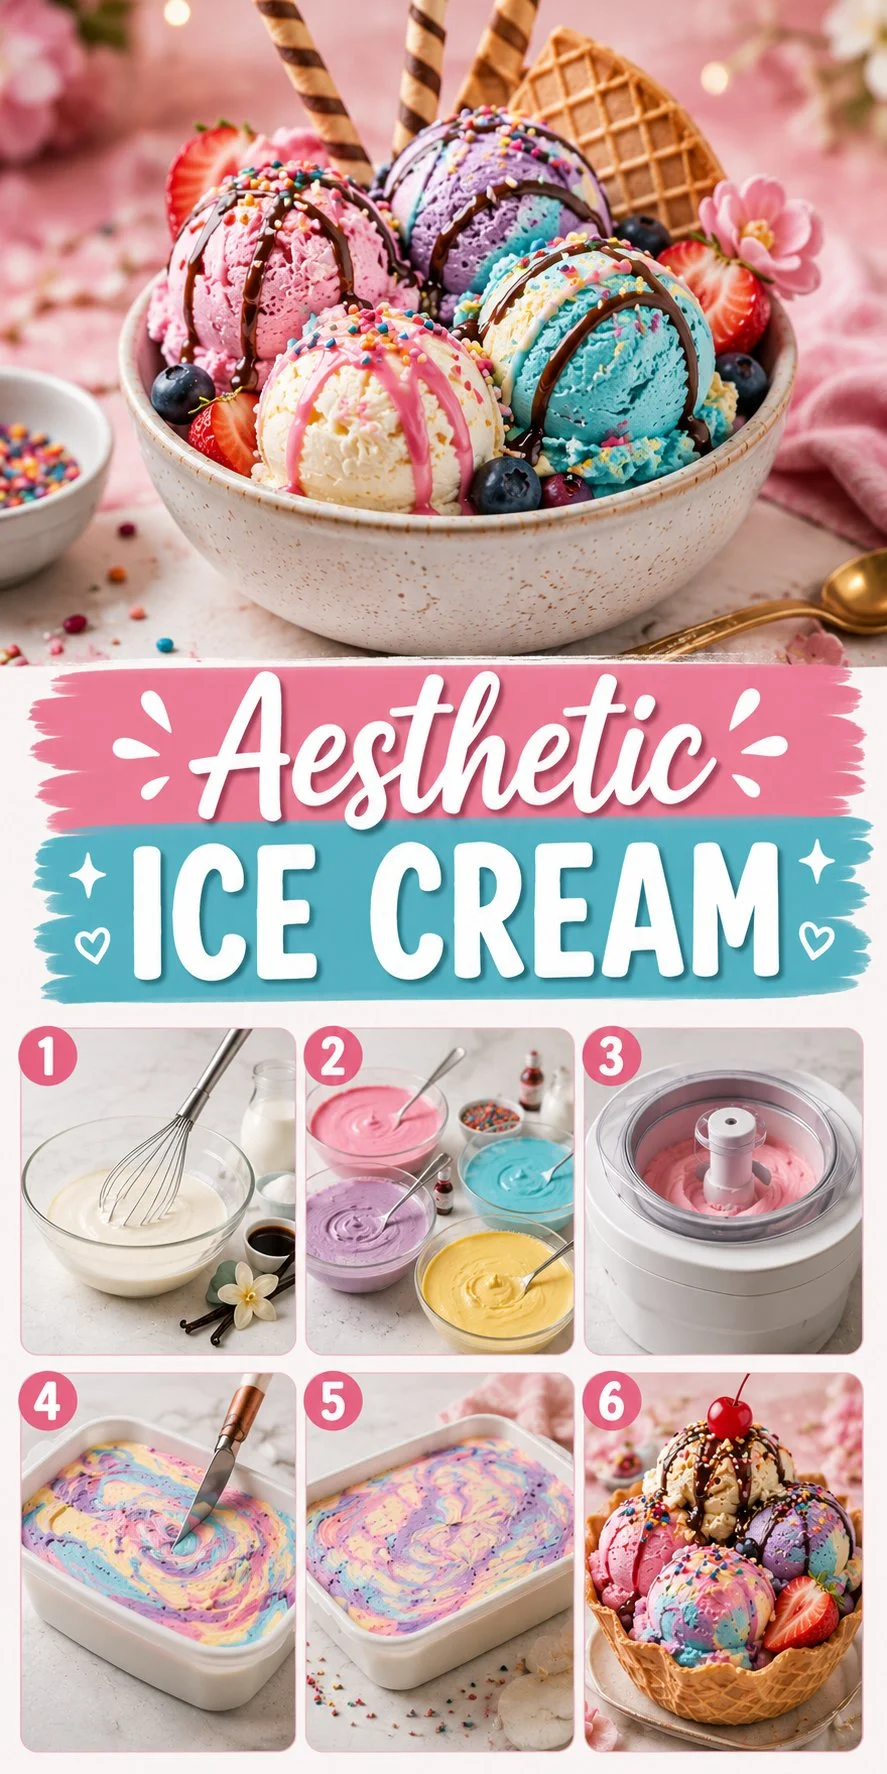
It was a hot summer day when I decided to indulge in something sweet and refreshing. While browsing social media, I stumbled upon a trend that had taken the world by storm: aesthetic ice cream. Its vibrant colors and unique presentations caught my eye, inspiring me to try my hand at making my own visually stunning and delicious ice cream. The best part? I discovered that creating this delightful treat at home is quite easy and can be customized to fit any flavor preference. Aesthetic ice cream not only satisfies your sweet tooth but also serves as a beautiful centerpiece for gatherings or personal enjoyment.
What is Aesthetic Ice Cream
Aesthetic ice cream is more than just a dessert; it’s an experience that combines flavors, colors, and creativity. This ice cream trend emphasizes the visual appeal of the treat, incorporating bright colors and decorative toppings, which have taken over social media platforms like Instagram and TikTok. Imagine fluffy clouds of pastel colors or bold, neon shades that pop against a backdrop of cones and bowls. Aesthetic ice cream invites you to involve your creativity, making the process of making and enjoying ice cream a fun, artistic endeavor.
Creating aesthetic ice cream allows you to express your unique style. You can experiment with various toppings, color combinations, and presentation styles, making each scoop a masterpiece. Whether you choose vibrant sprinkles, fresh fruit, or decadent chocolate syrup as a finishing touch, the possibilities are endless. The trend has even inspired numerous artisanal ice cream shops to create visually stunning flavors, providing customers with both delicious and Instagram-worthy creations.
Why You’ll Love This Aesthetic Ice Cream
Aesthetic ice cream not only looks good; it tastes amazing too! There are several reasons why you will enjoy making and sharing this delightful treat.
- Quick and simple to prepare: With just a few ingredients and minimal equipment, creating aesthetic ice cream at home is accessible for everyone.
- Family-friendly: It’s a fun activity that you can enjoy with family and friends, creating lasting memories. Kids can help with mixing, coloring, and choosing toppings, ensuring everyone feels involved.
- Great for beginners: You don’t need to be a culinary expert to produce eye-catching and scrumptious ice cream. Simple instructions guarantee a delightful outcome every time.
- Customizable flavors: You can tailor the flavor profiles to your preferences, using various extracts, fruits, or even herbs. This allows you to create a unique version that matches your taste.
- Perfect for special occasions: Aesthetic ice cream can elevate any event. With thoughtful decorations and flavors, it can be the highlight of birthday parties, picnics, or family gatherings.
Ingredients
- 2 cups heavy cream
- 1 cup whole milk
- 3/4 cup granulated sugar
- 1 tablespoon vanilla extract
- Food coloring (optional)
- Toppings: sprinkles, fruit, chocolate syrup
Step-by-Step Instructions for Aesthetic Ice Cream
- In a mixing bowl, combine the heavy cream, whole milk, sugar, and vanilla extract. Stir until the sugar is fully dissolved, ensuring a smooth base.
- If desired, divide the mixture into different bowls. Add food coloring to each bowl to create a range of vibrant colors. Mix well to achieve the desired shades.
- Pour the colorful mixtures into an ice cream maker. Churn according to the manufacturer’s instructions until it reaches a soft-serve consistency.
- For a marble effect, pour the different colored mixtures into a lidded container in layers. Use a knife or spatula to swirl the colors gently.
- Freeze the ice cream for at least 4 hours or until it is firm enough to scoop.
- Serve the aesthetic ice cream in bowls or cones. Top with sprinkles, fresh fruit, or chocolate syrup for that perfect finishing touch.
Pro Tips and Variations
- Flavor Infusion: Experiment with different flavors by adding fruit purees like strawberry, mango, or chocolate icing to create unique and tasty combinations. You can also add extracts of your choice, such as almond or coconut, to provide an additional flavor dimension.
- Toppings Galore: The right toppings can elevate your dessert. Consider using crushed nuts, colorful candies, or edible glitter for a dazzling display.
- Presentation is Key: Use clear cups or bowls for serving, allowing the colorful layers to show through attractively. Garnish with fresh herbs like mint to add an aromatic touch.
- Non-Dairy Alternatives: For a dairy-free version, substitute the heavy cream and whole milk with coconut cream or almond milk. Ensure that any added flavors and toppings are also dairy-free for a complete adaptation.
- Incorporate textural elements: Mix in some crunch by adding cookie pieces or cereals into the ice cream base after churning but before freezing.
How to Serve Aesthetic Ice Cream
Serving aesthetic ice cream can be as creative as making it. Here are some fun ideas on how to present this colorful treat:
- Layered Cup Delight: Create layers of different colored ice cream in a clear cup. This not only looks beautiful but allows for guests to taste a variety of flavors in one serving.
- Dessert Bar Setup: For parties, set up a dessert bar with various toppings and sauces. This allows guests to craft their own aesthetic ice cream creations.
- Ice Cream Cones: Use waffle cones to present your colorful ice cream, adding a playful twist. You can even dip the cone’s edge in chocolate and then in sprinkles for an extra fun touch.
- Perfect Pairings: Serve with fresh fruit or a selection of cookies to complement the flavors in the ice cream. This adds a delightful contrast in taste and texture.
How to Store Aesthetic Ice Cream
To maximize freshness and maintain the texture of your aesthetic ice cream, it’s important to store it properly:
- Freezer Storage: Transfer your ice cream to an airtight container, ensuring minimal exposure to air to prevent ice crystals from forming. Label the container with the date and flavor for easy identification.
- Duration: Aesthetic ice cream can be stored in the freezer for up to two weeks. Beyond that, the flavors may begin to degrade, and the texture can change.
- Re-Serving: When ready to serve, remove it from the freezer and let it sit at room temperature for 5 to 10 minutes. This will soften it enough to allow for easier scooping without affecting the taste.
Nutrition Information
While the focus may be on the aesthetics and flavors, it’s also good to have an understanding of the nutritional aspects. A typical serving will primarily contain dairy along with sugar, which adds a significant calorie count. Balancing this with fresh fruits can contribute beneficial vitamins and fiber. For more health-conscious options, consider incorporating lower-sugar alternatives or non-dairy substitutes.
FAQs about Aesthetic Ice Cream
Can I make aesthetic ice cream without an ice cream maker?
Yes! You can mix the ingredients and pour them into a container. Stir every 30 minutes until it reaches the desired consistency.How do I prevent ice crystals in my ice cream?
Ensure your container is airtight, and minimize air exposure. Regular churning can also help create a smoother texture.What if I don’t like the color of the food dye?
You can skip the coloring entirely or use natural coloring alternatives, such as beet juice for pink or matcha for green tint.How can I make my ice cream softer?
If your ice cream is too hard when you take it from the freezer, let it sit for a few minutes before scooping. This will help return it to a softer, creamier texture.
Conclusion
Trying out aesthetic ice cream is an adventure that combines creativity and culinary delight. Its vibrant colors and delicious flavors make it a perfect treat for anyone looking to add a touch of sparkle to their desserts. Why not gather your loved ones and embark on your journey to create this stunning treat? Share your experiences and show off your delicious creations, and don’t forget to experiment with different ingredients and styles. Dive into this colorful world of aesthetic ice cream and let your imagination run wild!